Saturday, March 29, 2014

Disney's "Frozen" Anna Makeup Tutorial!


I know that I'm late on the bandwagon, but yesterday I watched "Frozen" for the first time and I fell in love with the movie! I really wanted to do a post on some of the characters, so I decided to do a post of how to achieve the makeup that some of the characters "wore" in the movie. This post is going to be about Anna's makeup, which is perfect for everyday! I'm also planning on doing a post on Elsa's makeup later! Read on to see how to achieve Anna's look from the movie!

Face:

  • Concealer: Since you can still see Elsa's freckles and imperfections, apply a concealer just to any problem areas and under the eyes.
  • Powder: Apply a translucent or powder is little coverage to your t-zone to prevent shine throughout the day.
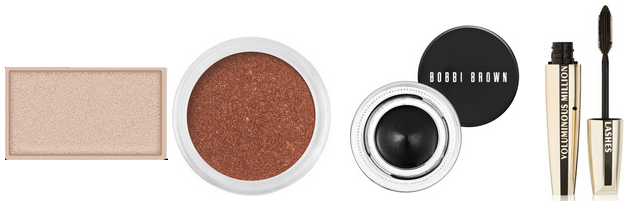
  • Rosy-Plum Blush: Blush is key to this look (since they are in the cold for most of the movie)! Apply a rosy-plum blush to the apples of your cheeks, blending it up to the sides of your face. (The shade shown is the Covergirl Classic Color Blush in "Iced Plum")
  • Highlighter: Apply a little to the cheekbones and blend to get her glow!

Eyes:
  • Matte Beige Nude Eyeshadow: Apply all over the lid. It didn't look like she was "wearing" anything too shimmery, so this shade will create a natural wash of color over the lid. (The shade shown is W.O.S. from the Urban Decay Naked Basics Palette)
  • Matte Taupe Brown Eyeshadow: Using a blending brush, apply a little lightly into the crease and outer corner and blend to avoid harsh lines. (The shade shown is Naked 2 from the Urban Decay Naked Basics Palette)
  • Black Pencil Eyeliner: Anna was wearing eyeliner, so apply a medium line on the upper lash line, making the line thicker in the outer corner. After applying, smudge the line a little with a smudger brush so that the line isn't super "clean", but still a line. 
  • Apply some of the black pencil lightly the the outer corner of your waterline.

  • Black Mascara: Apply two coats of mascara to your top lashes and one coat to your bottom lashes.
  • Tinted Eyebrow Gel: Use a gel or powder to fill in your eyebrows, but don't make them too defined and rather natural looking.


Lips:

  • Rosy Tinted Lip Balm: Finish the look by applying a rosy lip balm! (The one shown is Covergirl's Jumbo Gloss Balm in "Watermelon Twist")
I hope you enjoyed this post?
Who is your favorite character form the movie?
Mine is definitely Olaf or Anna! Please comment down below on your favorite!

Thank you for visiting!

Tuesday, March 25, 2014

Spring Beauty Musts! | 2014

First, I would like to say that I'm sorry for the lack of posts lately. I had finals last week but I promise for more posts! But believe it or not, winter is behind us and it is officially now spring! Don't get me wrong, I love winter and fall, but by the time march rolls around, I'm usually ready for the brighter colors and lighter looks! Spring screams fresh makeup for me, which is why many of the products I included are around the theme of fresher and lighter makeup. This spring, I have really been looking into both pastels and brighter colors that are a little more subtle. Read on to see some of my spring must haves for 2014!

  • Clinique Color Pop Blush in "Ginger Pop" is a peach-pink blush and one of the newer additions to Clinique's cosmetics line and one that I think adds to perfect hint of color for a fresh look. Any peachy-pink blush will due though!
  • L'Oreal Infallible Eyeshadow in "Iced Latte" is a light shimmery champagne eyeshadow that is good for a simple everyday makeup look. I think that light shimmery and pastel colors are perfect for the spring time, with them adding a light wash of color all over the lid for a fresh look.
  • Maybelline Dream Fresh BB Cream and any light foundation is perfect when the sun starts to come out and the weather warms up. This BB cream says it right in the name in that it provides light coverage without having to worry about makeup melting off your face as well as being affordable. It also has SPF, which is perfect when our skin comes in contact with the sun more!
  • NYX Butter Gloss in "Peaches and Cream" is a bright peach-pink lipgloss and a great way to add a pop of color to your spring makeup look without being too bold! Plus the gloss finish is prefect for spring and into summer.
  • Essie Nail Polish in "Mint Candy Apple" and "Fiji" and two pastel nail polishes that scream spring to me. "Mint Candy Apple" is pastel mint-green color and "Fiji" is a light pastel pink color, both which are subtle while still adding a little pop of color.

I hope you found this post helpful!
What is your spring must have?
Please comment down below!

Thank you for reading!

Thursday, March 20, 2014

Modcloth "Uniquely You" + Wanelo!

I am so excited to share to you all that I was recently contacted by Modcloth to participate in their Uniquely You campaign! When I received the email from Modcloth, I had to read over the email a few times because I couldn't believe that I was contacted to participate! I love the style that Modcloth features on their website and it has been one of my go-to websites for style and clothing inspiration for a long time, so I was so excited to be asked to participate!


Modcloth's Dinner Party Darling Dress is the perfect little black dress plus more! The simple shape with classic stripes and a bow at the waistline flatters all body shapes! I decided to pair this dress with a pair of simple suede black heels that has an ankle strap for delicate touch and to add to the classic design of the dress. For jewelry, I added a delicate gold statement necklace and gold stud earrings with a turquoise stone. I think that gold jewelry with black is the perfect combination and that the turquoise earrings add a pop of color to the outfit. I then added a structured black and gold clutch/crossbody bag to tie together the black and gold theme of the outfit. To finish the look, I added some peach-pink blush to add a bit of color to the face while still being natural!

Find the items shown above in my storyboard here!

Check out Wanelo (especially if you're a shopaholic)! It's a great way find new pieces of clothing, see what's in all your favorite stores, and organize clothing pieces (check out my story here)!

I hope you enjoyed this post!

Thank you for reading!

Friday, March 14, 2014

Simple St. Patricks Day Makeup Look! (School Appropriate!)


It's already almost that day of the year when you pull out your green, figuring out how much green you actually want to wear on St. Patricks day. This year, St.Patricks day if on a school day, so I wanted to do a post on a makeup look that is a school appropriate look while still incorporating a little green. You can leave out the face makeup and even the eyeshadow, but I just I wanted to include products for those who want a full makeup look. You can always adjust this look to your liking! Read on to see my simple St.Patty's look.

Face:

  • BB Cream: Apply a light foundation or concealer on your trouble areas to even out the skin tone.
  • Translucent Power: Apply a powder to the T-Zone to prevent your face from getting too oily throughout the day.
  • Bronzer: If desired, apply the bronzer lightly to the hollows of your cheeks and on your temples.
  • Pink Blush: Apply a light pink blush lightly to the apples of your cheeks to add a little more color to your face. 

Eyes:
  • Light Shimmery Champagne Eyeshadow: Apply this eyeshadow all over the lid up until the crease. This will really brighten your eyes! (The eyeshadow shown is L'Oreal's eyeshadow in "Iced Latte")
  • Light Matte Brown: This step is optional and for those who want a little more definition. Apply the color with a fluffy crease brush and blend gently into the crease.


  • Dark Forest Green Eyeliner: For the pop of green part of the look, apply a green eyeliner on the upper lash line. If you want a little more definition, also apply the green eyeliner on the outer corner of the bottom lash line. (The eyeliner shown is Jane Cosmetic's eyeliner in "Kelly Green" but the shade "Forest Green" also works for a subtle look!)
  • Black Mascara: Apply a black mascara to really make the eyes pop and bring out the green!

Lips:

  • Light Pink Lip Balm: Apply a light pink lip balm to finish off the simple look! (The one shown is Revlon's Lip Butter in "Pink Lemonade")

Check out my other St. Patricks Makeup Look here!

I hope you found this helpful!
How do you wear green on St. Patricks Day?
Please comment below and follow!

Thank you for reading!

Tuesday, March 11, 2014

Tuesday Ten: Favorite Hair Buns and Knots

One of the most timeless hairstyles is the simple hair bun. Whether it's just an easy loop knot or a more intricate braided bun, hair buns are simple way of adding more to a look while not having to worry about your hair being in your way. I personally always wear a simple hair bun when I'm just around the house because its an easy way to keep my hair out of my face when I'm busy. I also, however, love the look of a more complicated bun with twists and braids and I think that they look so elegant for a special occasion! Read on to see some of my favorite hair buns and knots!

Swirl Hair Bun
Sock Bun
Side Twists Into A Bun
Bow Bun
Messy Bun
Headband Tuck Bun
Messy Sock Bun
Messy Side Bun
Half-Up Messy Bun
Twisted Bun
And here's an extra photo that I found that was too cute not to include in this post..


I hope you enjoyed this post!
What's your favorite hair bun?
Please comment below and follow!

Thank you for reading! <3

Friday, March 7, 2014

5 Tips for Bigger Eyes! (like Zooey Deschanel!)


Celebrities from Twiggy to Zooey Deschanel to Katy Perry have drawn more attention to the eyes, with many people wanting to achieve that doe-eyed look. Here I have 5 steps to make your eyes look bigger and brighter! Many of these steps just open up the eye, making your eyes look bigger. These are all very simple steps that can easily be incorporated into your everyday makeup look!

  • Dark on Top: A good way of making your eyes looking wider is by the illusion of a thick lash line using black eyeliner. Apply the eyeliner along the upper lash line, and just the upper lash line! Adding black eyeliner to the bottom lashline can close off the eyes, creating the opposite effect. (Stila All Day Liquid Eyeliner is a good waterproof black eyeliner!) 
  • Light on Bottom: Apply a nude eyeliner to the waterline to not only make your eyes look bigger, but will also brighten the eye! If you want more definition apply a brown eyeliner to the bottom lashline, not a black eyeliner. Like I said above, black can be too harsh and actually sometimes make your eyes look smaller. (Rimmel Scandal Eyes Eyeliner in "Nude" is a good, but very affordable nude eyeliner)
  • Curl Curl Curl! This one is definitely the most important for making your eyes look bigger! It is a must! Curling your eyelashes can change your life (well, more like your makeup routine). It will open up your eyes and immediately make your eyes look wider! (Shu Uemura eyelash curler is a top-of-the-market eyelash curler)
  • Mascara: This one may be obvious, but it is a definite must for bigger eyes! Mascara bring more attention to your eyes and with curling your lashes, it will help open up your eyes and make them look bigger! (Benefit They're Real! mascara volumizes and lengthens the lashes)
  • Conceal/Brighten: Lastly, concealing your under eye area and brightening it will really bring attention to your eyes and make your eyes look bigger because dark circles can sometimes close off the eyes! Plus, it can make you look more awake! (Maybelline Dream Lumi Touch Concealer both illuminates and conceals under eye circles)

I hope this helped!
As you can see from above, the main tip that I have to make your eyes appear bigger is by keeping it dark on the top and light on the bottom. 
What is your favorite makeup tip?
Please comment down below and follow!

Thank you for reading!

Monday, March 3, 2014

Get the Look: Emma Watson Oscars 2014 Makeup Look!


I will admit. I completely forgot that the Oscars was last night and I didn't realize it until the evening time, so I missed the red carpet footage. I was pretty bummed out since I love Ellen, who you probably know was hosting the Oscars, but in my defense, I don't watch TV so I didn't have a constant reminder of when the Oscars were. But luckily there's the internet! I spent I while going through the dresses and hair and makeup of the actresses and one that popped out was Emma Watson's. I loved her dress, her casual hair do, and classic makeup look! Simple but extremely elegant! Read on to see I recreated her makeup look!


Face:
  • Foundation: Start off the makeup by applying your favorite foundation evenly on your face. An illumining foundation would be perfect for this look to get Emma Watson's glow!
  • Brightening Concealer: Apply a brightening concealer under your eyes to brighten the eye area.
  • Light-Medium Pink Blush: It doesn't look like she is wearing any bronzer that stands out, so apply a pink blush to the apples of your cheeks, blending it to your temple to help define the cheekbones.
  • Light Highlighter: To get her glow, apply a highlighter to the tops of your cheekbones and down the bridge of your nose and blend.

Eyes:
  • Champagne Eyeshadow: After applying a primer, apply a champagne eyeshadow all over the lid. This will brighten the eye look!
  • Red-Toned Matte Brown Eyeshadow: Apply this eyeshadow with a fluffy crease brush into your crease, blending it though the crease all the way to the inner corner par of the crease. Blend well, but be sure not to blend in onto the lid.
  • Black Gel Eyeliner: Using a thin eyeliner brush, apply a very thin line to the upper lash line. Emma Watson is wearing eyeliner put it is so thin and close to the lash line that it is very natural looking.
  • Black Mascara: Apply two coats of black mascara to your upper and lower lashes!


  • Eyebrow Gel: Emma Watson always has near to perfect eyebrows, so groom your eyelashes with a clear or tinted eyebrow gel, depending on your preference. I like using Maybelline's clear mascara because it's affordable and does the job!

Lips:


I hope you found this helpful!
What was your favorite Oscars look?
Please comment below!

Thank you for reading!
Related Posts Plugin for WordPress, Blogger...